I hope everyone had a great holiday and is gearing up to head back to school now! I always loved the new semester starting--it gave me the feeling of getting to 'start over' and a new opportunity to make things even better.
That is certainly how I'm feeling about our AVer Pilot Sites. I know many of you have had a rough start due to the bugs that were still in the software. I was very encouraged at our recent meeting though with the newest release of the software that is coming. It truly resolves the issues that have been most frustrating to us all.
I will be visiting all of my pilot sites in January and helping you to get things moving along again. I hope as we do that we'll have a greater opportunity to share lessons and teaching strategies with one another through this blog.
If you have any upcoming plans for using your AVerPens and/or doc cam, we'd love to hear about them here. That would give us all an opportunity to brainstorm ideas together and help one another create really outstanding lessons!
Happy new year to you all!
Tracy
Wednesday, December 30, 2009
Thursday, December 3, 2009
Which software should I install for my AVerMedia products
Here's a rule of thumb. Always check the AVerMedia download page here for the latest software supported by each AVerMedia Document Camera and the AVerPen: http://www.avermedia-usa.com/presentation/download.asp
Current Release posted on website: AVer+ version 1.3.1.09 (MAC) and version 1.3.1.11 (PC)
Supports:
- AVerPen
- V355AF
- CP135
- CP155
- CP355
- CP130
- CP150
- SPC300
We have shipped the older version AVer+ 1.1.1.01 with some of our AVerMedia Document Cameras such as the CP135/155/355/V355AF recently and this version DOES NOT include the AVerPen module so it’s best to download the latest copy on our website. (uninstall the old copy and install the new one).
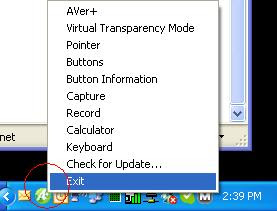
NOTE: If you have difficulty uninstalling the older software, check your Windows task bar and exit the "AVer+ Control" icon. On the MAC, this icon can be found at the top menu bar.
If you have comments, please send them to andy.teoh@avermedia.com
Current Release posted on website: AVer+ version 1.3.1.09 (MAC) and version 1.3.1.11 (PC)
Supports:
- AVerPen
- V355AF
- CP135
- CP155
- CP355
- CP130
- CP150
- SPC300
We have shipped the older version AVer+ 1.1.1.01 with some of our AVerMedia Document Cameras such as the CP135/155/355/V355AF recently and this version DOES NOT include the AVerPen module so it’s best to download the latest copy on our website. (uninstall the old copy and install the new one).
NOTE: If you have difficulty uninstalling the older software, check your Windows task bar and exit the "AVer+ Control" icon. On the MAC, this icon can be found at the top menu bar.

If you have comments, please send them to andy.teoh@avermedia.com
Wednesday, December 2, 2009
How do I save Images and Videos using the new AVer+ software and an AVerVision Document Camera (Visualizer!)?
A lot of you have asked about this so here's a short little guide we came up with that might help dispell curious minds out there.
This guide was written specifically with the AVer+ Windows version 1.3.1.04 in mind.
1. Launch AVer+ and click on the AVerVision icon (assuming that you already have an AVerVision Document Camera hooked up).
2. Click on "Setting" which is the last icon and change the save in directory to a folder you are familiar with. If you need to tweak the size of the JPG capture or video capture this is also the place to select the appropriate size.
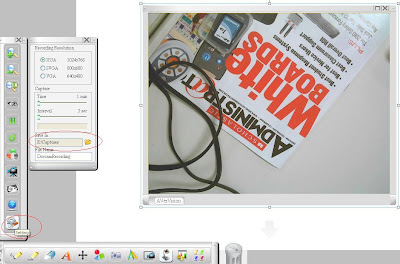
3. Now click on the "AVerVision Capture" icon and proceed to check "Save to folder" (See picture)
This guide was written specifically with the AVer+ Windows version 1.3.1.04 in mind.

1. Launch AVer+ and click on the AVerVision icon (assuming that you already have an AVerVision Document Camera hooked up).
2. Click on "Setting" which is the last icon and change the save in directory to a folder you are familiar with. If you need to tweak the size of the JPG capture or video capture this is also the place to select the appropriate size.
3. Now click on the "AVerVision Capture" icon and proceed to check "Save to folder" (See picture)

4. Now you should be able to click on "Single Normal Capture" or "Continuous Capture". The JPG image would then be saved into the folder that you had selected previously.
5. If you need to copy and paste the picture into another application (such as Powerpoint or Paint), right click on the picture and select "Copy".

6. Now launch MS Power Point (TM) and proceed to "paste" the object into this application.

7. Now let's launch Windows explorer. Proceed to the "save" folder and you should be able to find the saved JPG images (see below).

8. Coming back to the AVer+ software. If you need to do a short video recording proceed to click on the "AVerVision Record" icon and then click on the "record" button.

9. After you have recorded a short clip you can then proceed to Windows Explorer to find the saved video clip (See below).

We hope this short little guide explains some of the basics of the AVer+ software. Look for more upgrades and improvements to the software in the coming months.
Friday, November 13, 2009
Text opening all funky
So I have been spending some time lately developing curriculum lessons to use when I demonstrate the AVerPens. I put a lot of work into them so that they embody the points that I want to make with a particular audience. I get it to look nice and professional. Then I transfer it from my big screened iMac over to my MacBook that I travel and demo with. It never fails that when I open it, some of my text fields are all scrunched up, some are not even there and others look.....well, terrible.
If this has happened to you, well then you know the frustration. Sometimes this even happens when I create them on my MacBook and then open it the next time. Then there is the case of creating it on a Mac then opening it in a Windows environment or vice versa. Ok....we are working on some fixes to aid this situation. But what it boils down to is there is a text issue and a text field issue.
In that, I mean the text issue is common in PowerPoint, Smart Notebook and other cross platform slide tools. It is that the fonts on one computer where you create your lesson are not present on the other computer. So understand this issue and try to use the common fonts that are on most computers in either platform. The other is the size of the text field that you create to put your text into.
We tend to keep things tight and orderly when we created worksheets and slides. So we try to make our text field, the box around the text with the pull handles and dots, snug up close to the text itself. If you do this, chances of truncating your text will be great. Try keeping a little wiggle room around your text with the text box.
Here are a few recommendations pulled from Microsoft site on PowerPoint:
· Watch your fonts. Check Format, Replace Fonts to see what fonts are used in your presentation. You can safely count on Arial, Times New Roman, Courier and Symbol being present on most Macs. Tahoma and Verdana will probably be present on any PC with Office installed, but may not be present if the Mac has only the free PowerPoint Viewer. Mac versions of PowerPoint can't use embedded fonts.
· Don't squeeze your text too tightly into placeholders. Font substitution and slight differences in text rendering on Mac vs PC can cause your text to get truncated or spill out of too-tight text boxes.
· Don't squeeze your text too tightly into placeholders. Font substitution and slight differences in text rendering on Mac vs PC can cause your text to get truncated or spill out of too-tight text boxes.
I hope this helps you as you journey through the AVerPen and AVer+ learning curve.
Tom
A shopping trip...
Yesterday I spent some time at a the teacher supply store in Knoxville. I was on the quest for some colorful workbooks that I could use in presentations. (That's one of the great things about document cameras used with the AVerPen...I can have a colorful page instead of a black and white copy, and I can use it over and over again. Awesomeness!)
I always loved those stores as a teacher. All the neat lesson idea books, all the cool posters, the irresistable lure of cutely shaped post-it notes...it is indeed one of my favorite stores to visit!
When I would visit stores like that, I would walk up and down the aisles looking at all the manipulatives and games that would be so awesome in lessons, but always left them behind. Why? Because buying one set at $12 was not a big deal, but when I factored in that even with small groups I'd need four, five or six sets...the cost became prohibitive.
Yesterday though I realized that with a document camera, I can purchase just one set of manipulatives, or one game board, and use it under my document camera. When that dawned on me...I went a little nuts! I found my arms full of tons of cool things. (Okay...I eventually put most of them back as I don't actually teach anymore, but if I did, man oh man!)
Just a couple of things for you to think about:
I purchased two sets of dice for math. One set had numbers up to 30 and the other set had operations (+, -, x, etc.) Since they show up great under my document camera, I can use those for a math lesson. Add the AVerPen in there, and you could show the document camera image and then have students in groups solve the problem and show their work using the student pens. Yes...it's just math problems...but the dice rolling on the big screen, the collaborative work in groups, and the engagement with the pens takes it to a whole other level. Cost: $8 for both sets.
I also purchased a small globe. I was a social studies teacher and having a globe was always important. Yet in most of the schools I taught in, I could only have one globe for my class...maybe two. Why? They cost upwards of $50! Yesterday I purchased a small globe on a stand that rotates in all directions for $10. With my document camera, I can zoom in so close that the entire screen can be consumed by three letters of the word "Honduras"! It is awesome! (That's tiny made big...I could barely find the word "Honduras" on that little globe with the naked eye! ha!)
Other than the one colorful workbook I came home with, I saw a lot of other really great things...
-models of hearts, brains, and other body parts that broke apart into cross-sections
-spelling games
-money manipulatives
-science project kits
-magnet activities
and tons more!
Go check out what you can find that is suddently affordable because you only have to buy one!
"Document Camera Not Connected"...
Have you gotten this message in the AVerPlus software when you try to pull up the document camera image into your software so that you can annotate over it? I sure have, and one of our pilot site teachers has as well.
Here's how to solve it:
There is a switch on the side of your document camera that has a little arrow underneath it. If your document camera isn't showing up in the software, move that switch in the other direction.
There is another switch on the other side of the camera. It says "TV" on one side and "RGB" on the side. It should be switched to RGB.
Let us know if this doesn't work for you!
Saturday, October 31, 2009
Doc Cam as Web Cam: Bringing the world to us
Happy Halloween AVerAcademy Team!
I was just thinking about the term collaboration. It is such an important aspect of the 21st Century Classroom dynamics. I have to admit that so far I have limited my thinking to implementing collaboration within groups in a classroom. Today, I came to realize that since we are truly a global community with awesome communication tools, how can we extend the collaboration to include resources outside of our classrooms, buildings and districts?
Two words came to mind instantly: Skype and iChat. These two tools allow for chat, audio and video communication anywhere in the world. Skype is free and iChat requires membership. But they are both robust in their ability to bring communication down to a click and connect metaphor. Why not use them? My grand daughter is in an AVerAcademy classroom and was home from school last week with the flu. She found Ms. Downey's Skype address and Skyped into class. Ms. Downey was gracious enough to allow her to participate via video/audio in a portion of the day. That seems rather minor and self effacing, but thinking of the potential opened quite a few ideas.
Why not use these tools for group project research? OK....many schools do not have cameras and microphones on their classroom computers. But then comes the epiphany: your AVerMedia doc cam is also a web cam! Microphones are extremely inexpensive devices that can be purchased at any Best Buy or other electronic stores for $10! Why not start using this part of the solution to bring in other classes, teachers, scientists, doctors, nutritionists, etc. into our projects?
In fact, I have been using Skype to answer questions and offer help to some of you! Using the screen share feature allows me to control your computer to show how to do some things within the AVer+ software. Imagine what we can learn and share with the rest of the world if we use all of the potential of our solutions!!!
I know you are absorbed in learning the new software and how it works with both the doc cam and the pens.....but I am offering up the challenge to push a little further. Who will pick up the gauntlet and share their experience using the doc cam as a web cam?
Can't wait to hear and share in those experiences!!!! Also, I am ready, able and very willing to participate in your trials. Please call on me for help and advice if you need it. But I also know that you all are some of the most creative and technically astute educators in the country, so lets give it a shot!
My Skype name is: tompisano1
My iChat name is: tompisano1@mac.com
My email is: tom.pisano@avermedia.com
Lets do this thing!
Tom
Wednesday, October 28, 2009
AVerPen Q and A
Hi Everyone!
I just had the opportunity of having Tom Pisano visit my classroom and present us with a set of AVerPens yesterday. He did a great little lesson for my first grade class, and got them very excited about using them! He also gave me a rundown of the features of the AVerPens.
I created a lesson yesterday after school which I had the students try today. The only problem I ran into was that the kids had a hard time selecting some of the text boxes to manipulate. I had several text boxes which they had to click and drag to pair rhyming words. I don't know how to snap the frame of the text boxes closely around the letters of the words. The excess space in the text box often overlaps the other text boxes, making it hard to select a word (if it's stuck underneath) without having to move the text box on top of it. Any suggestions? I appreciate any help I can get on this one. (I haven't read any instructions/seen any tutorials.)
Monday, October 26, 2009
Google Accounts
Hello all!
Looks like a few of you are having trouble actually getting onto the blog as an author. The best I can, this is what you'll need to do:
* Go to Google.com/accounts and sign up for a google account using the same email address that I sent the blog invitation to.
* Then follow the directions in the automated email you received from blogger/google. This will make you an 'author' of this blog and allow you to create original postings.
There are still several more teachers that will be joining us here--I believe we should have 9 or 10 at this point, with more to come in the next few months.
Once you've got your account and you are an author, we'd love to hear where you are with your pilot right now and how things are going...the good, the bad and the ugly!
Monday, October 19, 2009
Introductions
It might help if we get started by introducing ourselves to one another. I will take the liberty of introducing the DE team from AVerMedia. Then if each of you will leave a comment to this post sharing a little about yourselves, that would be great!
Our Education Development Team is made up of three former educators: myself (Tracy Weber), Nancy Sturm, and Tom Pisano. Each of us spent years in the classroom before getting more directly involved with instructional technology and branching out in different directions. Now our purpose is to support teachers and schools as they work to integrate AVerMedia tools (and other technologies!) into the curriculum. We really want to be a resource for you all and are here to help you in this learning adventure. Don't hesitate to ever contact any of us.
I will leave it to each DE to share additional information in the comments to this post. We would also love for all of our teachers to do the same!
Happy blogging!
Welcome!
I want to thank all of our teachers for participating in this pilot program. We are thrilled to be working with you and really appreciate your help in showcasing our tools and in helping us find ways to make them even better.
This Blog site is for the purpose of sharing ideas with one another. All pilot site teachers will be invited to join the blog, as well as all of the Education Development Executives from AVerMedia. We want you to feel free to share your good ideas, success stories, frustrations, and to ask any questions you may have. The purpose is to support one another as we work.
For your first post, please take a moment to introduce yourself to everyone and let us know where you are in piloting your AVerMedia tools. Beyond that, post as you like and interact with others who are participating. This should be a great place to spark some good ideas!
Subscribe to:
Comments (Atom)