I hope everyone had a great holiday and is gearing up to head back to school now! I always loved the new semester starting--it gave me the feeling of getting to 'start over' and a new opportunity to make things even better.
That is certainly how I'm feeling about our AVer Pilot Sites. I know many of you have had a rough start due to the bugs that were still in the software. I was very encouraged at our recent meeting though with the newest release of the software that is coming. It truly resolves the issues that have been most frustrating to us all.
I will be visiting all of my pilot sites in January and helping you to get things moving along again. I hope as we do that we'll have a greater opportunity to share lessons and teaching strategies with one another through this blog.
If you have any upcoming plans for using your AVerPens and/or doc cam, we'd love to hear about them here. That would give us all an opportunity to brainstorm ideas together and help one another create really outstanding lessons!
Happy new year to you all!
Tracy
Wednesday, December 30, 2009
Thursday, December 3, 2009
Which software should I install for my AVerMedia products
Here's a rule of thumb. Always check the AVerMedia download page here for the latest software supported by each AVerMedia Document Camera and the AVerPen: http://www.avermedia-usa.com/presentation/download.asp
Current Release posted on website: AVer+ version 1.3.1.09 (MAC) and version 1.3.1.11 (PC)
Supports:
- AVerPen
- V355AF
- CP135
- CP155
- CP355
- CP130
- CP150
- SPC300
We have shipped the older version AVer+ 1.1.1.01 with some of our AVerMedia Document Cameras such as the CP135/155/355/V355AF recently and this version DOES NOT include the AVerPen module so it’s best to download the latest copy on our website. (uninstall the old copy and install the new one).
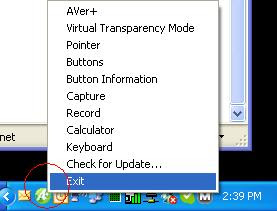
NOTE: If you have difficulty uninstalling the older software, check your Windows task bar and exit the "AVer+ Control" icon. On the MAC, this icon can be found at the top menu bar.
If you have comments, please send them to andy.teoh@avermedia.com
Current Release posted on website: AVer+ version 1.3.1.09 (MAC) and version 1.3.1.11 (PC)
Supports:
- AVerPen
- V355AF
- CP135
- CP155
- CP355
- CP130
- CP150
- SPC300
We have shipped the older version AVer+ 1.1.1.01 with some of our AVerMedia Document Cameras such as the CP135/155/355/V355AF recently and this version DOES NOT include the AVerPen module so it’s best to download the latest copy on our website. (uninstall the old copy and install the new one).
NOTE: If you have difficulty uninstalling the older software, check your Windows task bar and exit the "AVer+ Control" icon. On the MAC, this icon can be found at the top menu bar.

If you have comments, please send them to andy.teoh@avermedia.com
Wednesday, December 2, 2009
How do I save Images and Videos using the new AVer+ software and an AVerVision Document Camera (Visualizer!)?
A lot of you have asked about this so here's a short little guide we came up with that might help dispell curious minds out there.
This guide was written specifically with the AVer+ Windows version 1.3.1.04 in mind.
1. Launch AVer+ and click on the AVerVision icon (assuming that you already have an AVerVision Document Camera hooked up).
2. Click on "Setting" which is the last icon and change the save in directory to a folder you are familiar with. If you need to tweak the size of the JPG capture or video capture this is also the place to select the appropriate size.
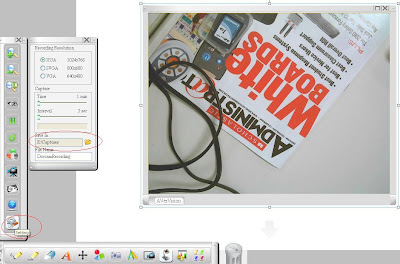
3. Now click on the "AVerVision Capture" icon and proceed to check "Save to folder" (See picture)
This guide was written specifically with the AVer+ Windows version 1.3.1.04 in mind.

1. Launch AVer+ and click on the AVerVision icon (assuming that you already have an AVerVision Document Camera hooked up).
2. Click on "Setting" which is the last icon and change the save in directory to a folder you are familiar with. If you need to tweak the size of the JPG capture or video capture this is also the place to select the appropriate size.
3. Now click on the "AVerVision Capture" icon and proceed to check "Save to folder" (See picture)

4. Now you should be able to click on "Single Normal Capture" or "Continuous Capture". The JPG image would then be saved into the folder that you had selected previously.
5. If you need to copy and paste the picture into another application (such as Powerpoint or Paint), right click on the picture and select "Copy".

6. Now launch MS Power Point (TM) and proceed to "paste" the object into this application.

7. Now let's launch Windows explorer. Proceed to the "save" folder and you should be able to find the saved JPG images (see below).

8. Coming back to the AVer+ software. If you need to do a short video recording proceed to click on the "AVerVision Record" icon and then click on the "record" button.

9. After you have recorded a short clip you can then proceed to Windows Explorer to find the saved video clip (See below).

We hope this short little guide explains some of the basics of the AVer+ software. Look for more upgrades and improvements to the software in the coming months.
Subscribe to:
Posts (Atom)